Guide to publishing libraries
In order to publish your library on JitPack you just need a working build file in your Git repository.
JitPack currently can build Gradle, Maven, Sbt and Leiningen projects. Let us know if you want to use it with other build tools.
If the project has a build.gradle file then it will be built using Gradle otherwise JitPack will look for a pom.xml, build.sbt or project.clj file. The build.gradle file can also be located in a subfolder.
Gradle projects
Projects using Gradle need to have either the maven or maven-publish plugin enabled. For example, if you add this to your build file:
apply plugin: 'maven'

group = 'com.github.YourUsername'
then JitPack will run:
./gradlew install
to install the jar and pom file in its local maven repository. With maven-publish plugin it will run
./gradlew build publishToMavenLocal
Note that if your project isn’t using a Gradle wrapper JitPack will build it with a recent version of Gradle. Therefore it is recommended to use the wrapper.
Example projects
- Simple - https://github.com/jitpack/gradle-simple
- Multiple modules - https://github.com/jitpack/gradle-modular
- Project with multiple artifacts - https://github.com/jitpack/gradle-multiple-jars
Android projects
See the Guide to publishing Android libraries with Gradle
Maven projects
JitPack will run:
mvn install -DskipTests
to build and publish Maven projects.
Your Maven group id is harvested from the top-level pom and then used to locate the installed artifacts in ~/.m2/repository. Binary jars, source jars and javadoc can all be picked up from there via the JitPack virtual repository.
If your project requires a specific Maven version then you can use the Maven Wrapper. In that case JitPack will run:
./mvnw install -DskipTests
Example projects
- Simple - https://github.com/jitpack/maven-simple
- Multiple modules - https://github.com/jitpack/maven-modular
Multi-module projects
If the project builds multiple modules JitPack publishes all of them. It will also generate a module that includes all of repository’s modules as dependencies. That way if you don’t know which module you want you can get all of them by adding just a single dependency to your build file.
To get individual artifacts of multi-module builds use com.github.User.Repo as group Id and ModuleName as the artifact Id.
Individual module in Gradle:
implementation 'com.github.User.Repo:Module:Tag'
or in Maven:
<dependency>
    <groupId>com.github.User.Repo</groupId>
    <artifactId>Module</artifactId>
    <version>Tag</version>
</dependency>
Tip: You can see a list of modules on jitpack.io if you Look Up your repository.
To get all modules of a project use the standard syntax:
implementation 'com.github.User:Repo:Tag'
Note:
If your project only has a single module then the dependency for that module is just com.github.User:Repo:Tag.
Examples:
- Multiple Gradle modules - https://github.com/jitpack/gradle-modular
- Multiple Maven modules - https://github.com/jitpack/maven-modular
N.B. in a Maven multi-module build, the top level is always a pom (not a jar), but it can still be used to aggregate javadocs, as long as they are published as a jar file when the project is built. You can configure the javadoc plugin at the top level like this, and the javadocs will be published with an artifact id the same as the top level pom:
<build>
    <pluginManagement>
        <plugins>
            <plugin>
                <artifactId>maven-javadoc-plugin</artifactId>
                <inherited>false</inherited>
                <configuration>
                    <aggregate>true</aggregate>
                </configuration>
                <executions>
                    <execution>
                        <id>aggregate</id>
                        <goals>
                            <goal>aggregate-jar</goal>
                        </goals>
                        <phase>package</phase>
                    </execution>
                </executions>
            </plugin>
        </plugins>
    </pluginManagement>
</build>
Sbt projects
JitPack can build sbt projects and also provide dependencies to sbt. When building an Sbt project JitPack will run:
sbt publishM2
To use JitPack repository from sbt add this to build.sbt:
resolvers += "jitpack" at "https://jitpack.io"
and then use:
libraryDependencies += "com.github.User" % "Repo" % "Tag"
JitPack also supports cross-building with the %% syntax:
libraryDependencies += "com.github.User" %% "Repo" % "Tag"
which will build the dependency with your current Scala version by calling sbt ++SCALA_VERSION.
Leiningen projects
When building a Leiningen project JitPack will run:
lein do clean, install
To use JitPack from Leiningen add the repository to your project.clj:
:repositories [["jitpack" "https://jitpack.io"]]
and then the dependency:
:dependencies [[com.github.User/Repo "Tag"]]
Build environment
Each build will have these environment variables:
-
JITPACK=true -
JAVA_HOME=<detected java home> -
GIT_COMMIT=<commit at which we're building> -
GIT_BRANCH=<current branch> -
GIT_DESCRIBE=<output of git describe command>
And the following project specific environment variables:
-
GROUP=<group id># com.github.USER -
ARTIFACT=<artifact id># Git Repository name -
VERSION=<version being built># A tag or commit
Custom commands
You can create a jitpack.yml file in the root of your repository and override the build commands:
jdk:
  - openjdk9
before_install:
   - ./custom_setup.sh
install:
   - echo "Running a custom install command"
   - ./gradlew clean install -xtest
env:
   MYVAR: "custom environment variable"
The install command is expected to create build artifacts somewhere in the project’s directory and
also to copy them to the local Maven repository ~/.m2/repository.
Environment variables
Custom environment variables can be set using the env section as key-value pairs. They will be available to your build on JitPack.
Additionally, you can configure environment variables in the Web UI on https://jitpack.io if you have a private repository. Look up your repository and click settings. This is useful if you don’t want to store environment variables in git.
Java version
JitPack will compile projects using OpenJDK Java 8. See the example projects on how to set a different target version in your build file.
Maven projects that specify a target version in their pom will be built with that target version.
If your project uses Travis or Circle CI then JitPack will read the lowest jdk version from yml file and use that to build.
Alternatively create a jitpack.yml file in the root of your repository and specify a jdk version:
jdk:
  - openjdk9
If your project requires a specific Java version then you can use SDKMAN in jitpack.yml:
before_install:
   - sdk install java 22-open
   - sdk use java 22-open
Troubleshooting
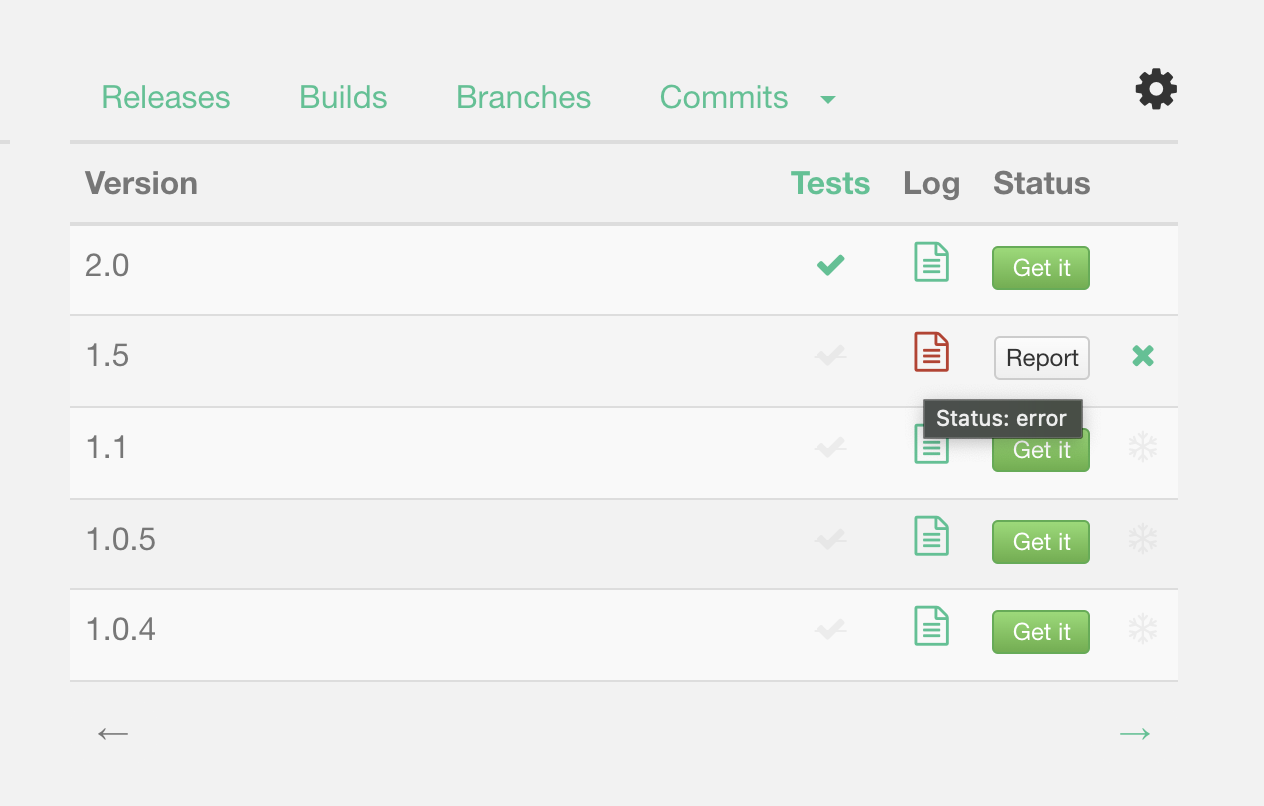
If there is an issue with a build, you will see a link to the log in the Status column.
You can also inspect the build log using the URL:
https://jitpack.io/com/github/User/Repo/Tag/build.log
and browse the files:
https://jitpack.io/com/github/User/Repo/Tag/
Although we monitor builds feel free to get in touch any time you face an issue or click the Report button. The easiest way is to open a GitHub issue or send a Support ticket from https://jitpack.io
Building ahead of time
You can also build snapshots on each commit if you add GitHub or Bitbucket Webhooks.
On GitHub go to repository Settings -> Webhooks & Services -> Add webhook.
Webhook URL:
https://jitpack.io/api/webhooks
Content type:
application/json
The webhook will trigger a build for branches that you have previously used with JitPack. So make sure you have requested master-SNAPSHOT from JitPack before adding a webhook.
Rebuilding
You can remove builds that didn’t succeed if you Sign In on JitPack.io and look up your repository. Requesting them again will result in the project being rebuilt.
You may need to run gradle with --refresh-dependencies flag in order to re-fetch the dependency. In maven use the -U flag.
Clean gradle cache
To clean the Gradle cache delete the HOME_DIR/.gradle/caches directory.